replica uhren

replica uhren
replica uhren

2019年2月27日星期三

Vier Designer-Riemen für den Tudor Heritage Chrono Reference M70330N-0005


Tudor Heritage Chrono Reference M70330N-0005

Der Tudor Heritage Chrono Reference M70330N-0005 bezieht sich auf den Tudor Oysterdate Chronographen aus den frühen 70er Jahren. Nur geringfügige Unterschiede haben die Leistung der Uhr verbessert und optimiert, während der ursprüngliche Geist des begehrten Originals erhalten bleibt.

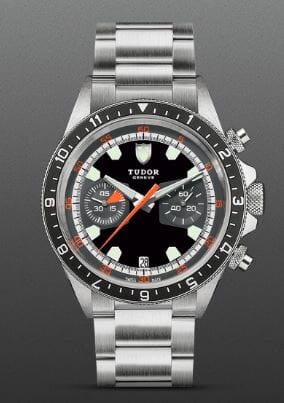
Der Reference M70330N-0005 wird mit einem 42-mm-Gehäuse mit polierter und satinierter Oberfläche geliefert. Die Wickelkrone ist auf beiden Seiten durch zwei Schutzeinrichtungen geschützt und mit dem Tudor-Logo am Rand versehen. Auf jeder Seite der verschraubten Krone befinden sich zwei Stahlschieber - um 2 Uhr und um 4 Uhr.


Tudor Heritage Chrono Reference M70330N-0005b

Die Lünette ist bidirektional drehbar mit 12-Stunden-Einteilung für eine zweite Zeitzonenanzeige. Die Scheibe besteht aus eloxiertem Aluminium. Das Zifferblatt ist in Schwarz und Grau und verfügt über einen 45-Minuten-Zähler für die 9-Uhr-Position und einen kleinen Sekundenzeiger für die 3-Uhr-Position. An der 6-Uhr-Position befindet sich eine Datumsöffnung. Die leuchtenden Stundenmarkierungen sind im fünfseitigen Tudor-Format gestaltet. Der Stunden- und der Minutenzeiger haben ein königliches Schwert und enthalten durchgehend Lumineszenz. Die GMT-Hand ist eine große, orangefarbene Schwerthand, die sich leicht an die orangefarbenen Ziffern in 5 Markierungsintervallen 5-60 an der Kante des Zifferblattes anpasst.

Das Uhrwerk wird von einem Automatik-Kaliber 2892 mit zusätzlicher Chronographenfunktion angetrieben. Sie bietet eine Gangreserve von 42 Stunden. Die Saphirglasfront bietet Wasserdichtigkeit bis 500 Fuß. Das originale Stahlarmband wird mit einer Faltschließe und einem Sicherheitsverschluss geliefert. Diese Modelle verfügen jedoch auch über ein passendes Nato-Band, das die orange, graue und schwarze Farbe des Zifferblatts kombiniert. Diese Uhr hat ein umwerfendes Aussehen und verfügt in ihrem 42-mm-Oyster-Gehäuse über hervorragende Funktionen.


Gummibänder für den Tudor Heritage Chrono Reference M70330N-0005b

Gummi B entwickelte 4 Riemen für den Tudor Heritage Chrono 42mm Reference M70330N-0005. Diese VulChromatic® Dual-Color-Gummiriemen wurden für den Tudor Heritage Chrono 42 mm entwickelt und sind mit „Blocked Integration“ -Engineering ausgestattet. Sie verfügt über massive Einsätze für eine einwandfreie, bewegungslose, bündige Montage am Uhrengehäuse.

Eine Schließe ist nicht im Lieferumfang dieses Riemens enthalten. Sie ist jedoch mit jeder handelsüblichen 18-mm-Dornschließe oder der Original-Faltschließe kompatibel. Alle Rubber B-Bänder werden in der Schweiz aus reinem vulkanisiertem Kautschuk hergestellt. Im Herstellungsprozess werden keine Beschichtungen, Mischungen, Klebstoffe oder Verklebungen verwendet. Für weitere Informationen besuchen Sie bitte unsere Seite hier . mehr sehen Replica Rolex Sea Dweller und fake watches

2019年2月15日星期五

Steps to Refinish the Bezel

With the jig prepared, we can now move on to refinishing the bezel. If the bezel has any particularly deep scratches, these should be removed at the outset, before following the steps outlined below. Deep scratches on the polished surfaces should, ideally, be remedied with a lapping machine. When lapping the numerals, be cautious not to facet them. The surface that the numerals occupy is not perfectly flat, but rather slightly convex. It is also advisable not to turn the lap in one direction only. Instead, vary the direction that the lap turns, forwards or reverse, to keep the gold or platinum from splaying out in one direction or the other. Deep scratches in the sandblasted recesses can be filed or burnished out carefully by hand. If the bezel is free from any deep imperfections, you can proceed to refinish the bezel using the steps below:
With any deep scratches already removed from the bezel, the first step to refinishing a Yacht-Master bezel is to polish the outer rim. Begin with several light touches around the perimeter of the bezel using the high-polish buff on your polishing machine to catch the recessed dimples.
Once the dimples have had their former shine restored, follow up with several passes on a lapping machine to polish the bezel’s perimeter while helping to maintain its crisp, clean edges. Several horological tool suppliers sell a specialized tool from Horotec (tool #23.501 on page 26) to aid in holding watch bezels during lapping. An even more specialized version of this tool is also available from Rolex. If no lapping machine is available, you can also chuck the bezel up in your lathe and polish the two outer faces with a flat bar of nickel or lexan charged with diamond paste.
To help bring out that extra level of shine, at this stage I like to give the polished surfaces a quick, light pass on a freshly dressed high polish cotton buff. Often, there is enough high polish compound left from lapping that I choose not to add any compound to the wheel. In the event that you need to add compound to the buffing wheel, add as little as necessary (if in doubt, err on adding next to nothing).
Mount the bezel in a lathe with the backside facing out and carefully apply a circular, grained finish to the back of the bezel with sandpaper.
Wash the bezel in an ultrasonic bath to remove any residue from the polishing compound. Any traces of polishing compound left on the bezel during sandblasting will yield an unsatisfactory finish by preventing the silica from coming into contact with the surface during sandblasting.
Next, seat the bezel in the jig we prepared and screw the top down finger tight. The polished perimeter of the bezel should now be fully protected by the jig, as pictured below.
Hold the jig, firmly, in your sandblasting cabinet, close the hatch and fire away. Direct the flow of sand onto the bezel, rotating and adjusting as necessary to get smooth, even coverage.
Examine the sandblasted surface of the bezel under a loupe to ensure a consistent surface finish. Repeat step 7 if needed.
Remove the bezel from the jig and wash it in an ultrasonic bath. If necessary, brush it lightly with a soft bristled brush to remove any debris from sandblasting.
Inspect the surface finish, both on the sandblasted area and the polished perimeter. Repeat the necessary steps if either surface is blemished.
Cover the bezel in a single layer of masking tape, without leaving any gaps. Polymide tape, which is typically what is used to protect a surface during refinishing, is not suitable for the tasks that follow as it is too thick and has very high heat resistance.
Using a piece of pegwood, sharpened like a flathead screwdriver, press the masking tape down around the numerals and indices, resulting in an embossed effect.
Using a small felt polishing buff in conjunction with a handheld micromotor, such as a Foredom, Dremel, or other variable speed micromotor, polish through the masking tape to reveal the numerals and indices, while paying careful attention not to come into contact with the sandblasted surface.
Once the numerals and indices have all been polished, remove the masking tape. Alternatively, before removing the masking tape, you can pass the bezel lightly through a high polish mop as in step 3.
The high heat produced during the polishing of the bezel indices will have caused some of the masking tape to melt and adhere strongly to the bezel. You can remove any residue from the masking tape by soaking the bezel in acetone for several minutes. To help speed the process along, you can scrub the bezel gently with a natural hair brush, such as those made of horse or hog hair. The bristles of a synthetic brush will degrade and congeal in acetone.
Wash the bezel in an ultrasonic bath, rinse, and finish with steam.
Inspect the work to ensure excellence.

The bezel is now ready to be re-installed on the refinished case.mehr sehen rolex replicas und replika rolex

replica rolex

replica rolex
replica rolex